


Last-Minute Halloween Costumes You Can Make with Duct Tape

Q&A with Organizational Pro Peter Walsh + Dermatologist Shares A…
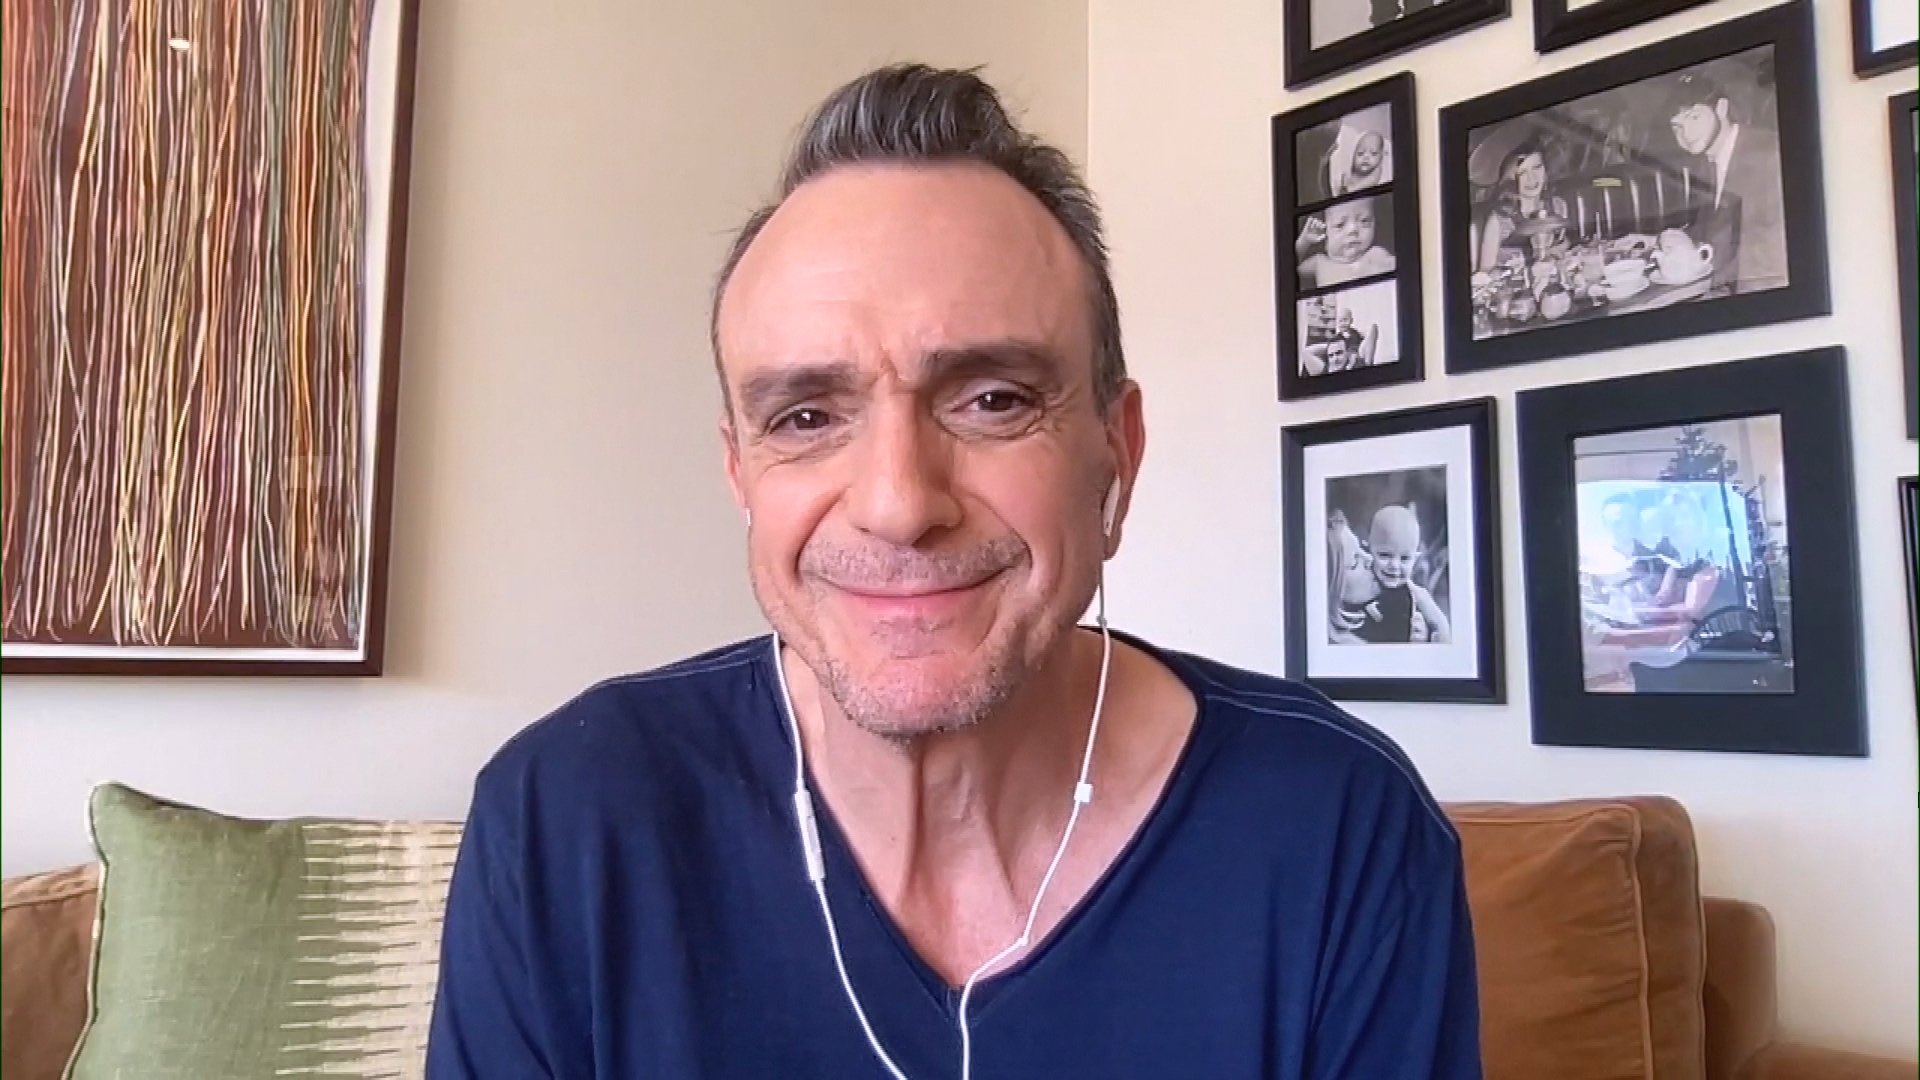
Actor Hank Azaria + Freezer Meals + Artichokes 2 Ways with Rach

See Inside Barbara Corcoran's Stunning NY Apartment + It's Steak…
The Best Moments From 17 Seasons of the Show Will Make You Laugh…

How to Make Chicken and Lobster Piccata | Richard Blais

Donnie Wahlberg Spills Details About NKOTB's First Ever Conventi…

Donnie Wahlberg + Jenny McCarthy Say Rach Is Such a "Joy" + Look…

How to Make Crabby Carbonara | Rachael Ray
Rach Chats "Firsts" In Flashback From Our First Episode Ever In …

How to Make Tortilla with Potatoes, Piquillo Peppers and Mancheg…

How to Make Sesame Cookies | Buddy Valastro

How to Make Apple-Cider Braised Pork Chop Sandwiches with Onion …

Rach's Chef Pals Say Goodbye to Show in Surprise Video Message

Celebrity Guests Send Farewell Messages After 17 Seasons of the …

Andrew McCarthy Teases Upcoming "Brat Pack" Reunion Special
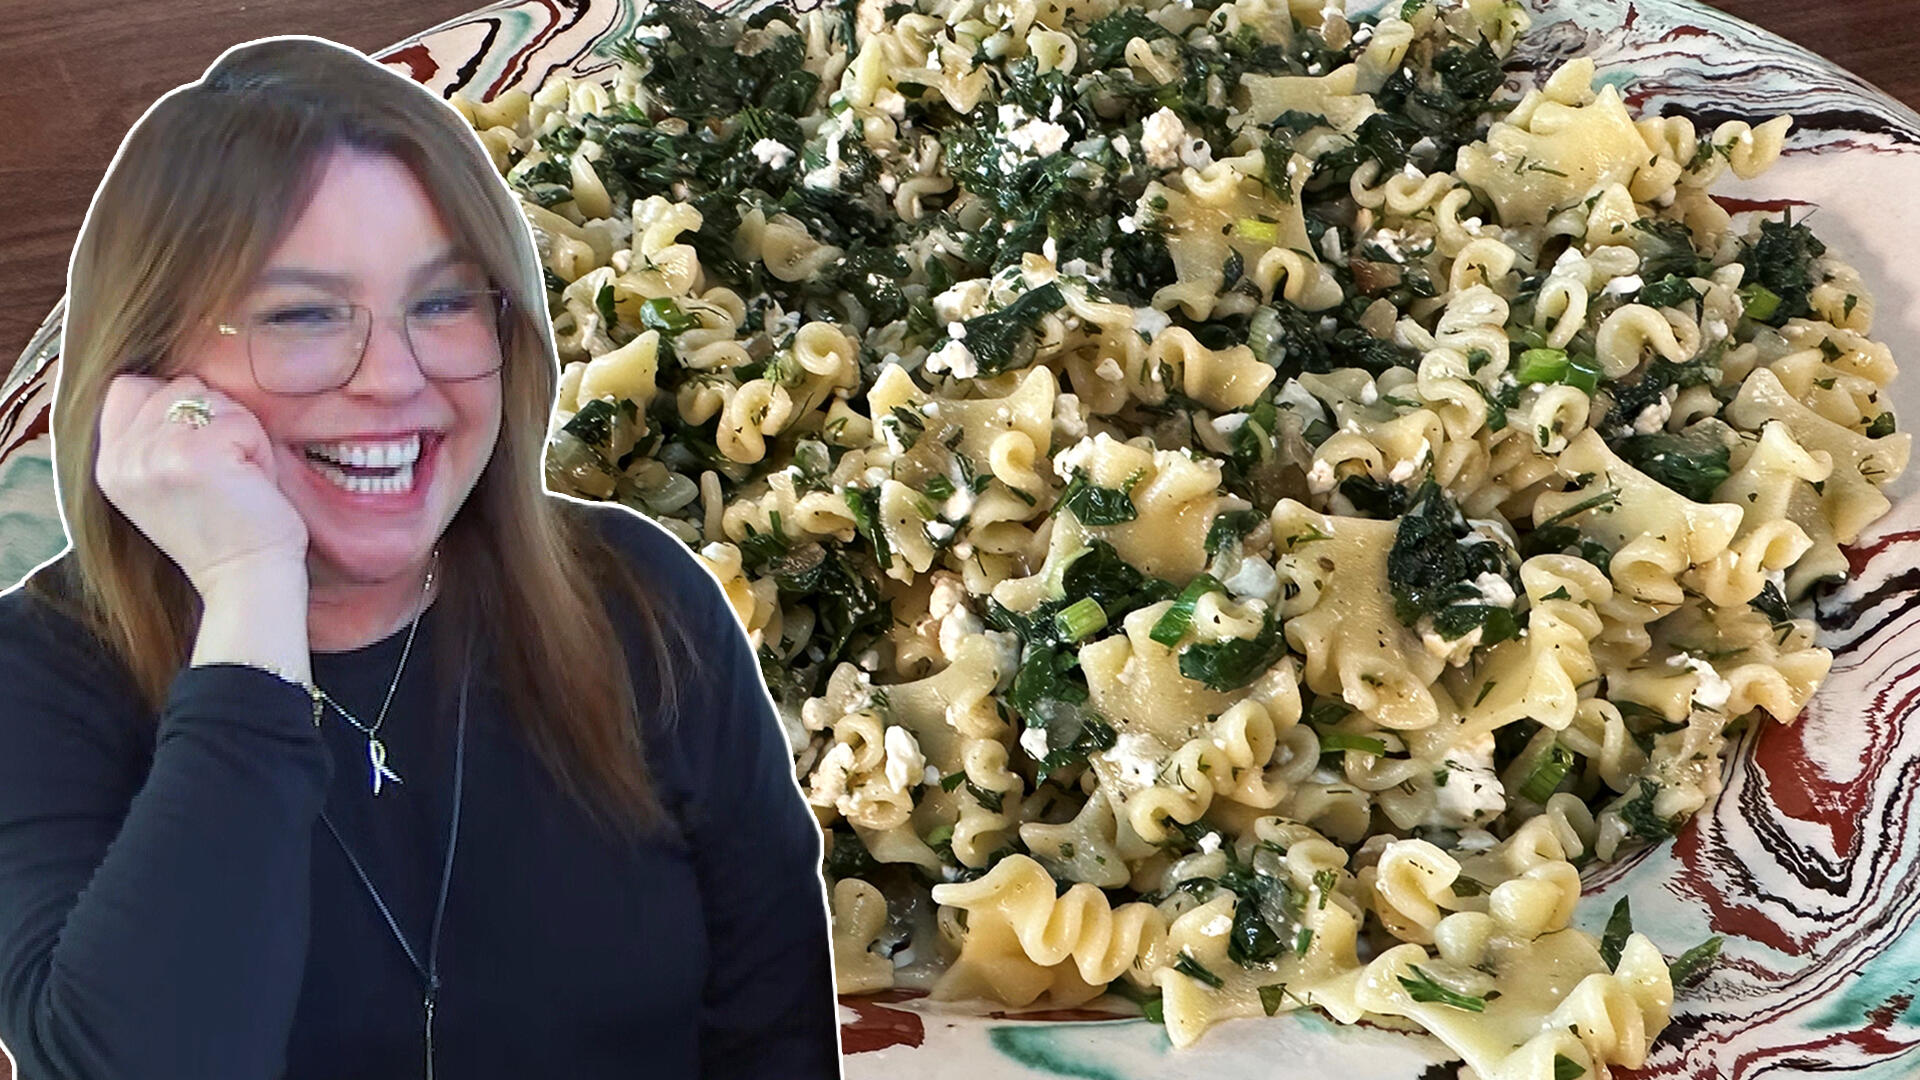
How to Make Spanakopipasta | Rachael Ray

Michelle Obama Toasts Rach's 17 Years on the Air With a Heartfel…

How to Make Shrimp Burgers | Jacques Pepin

Andrew McCarthy Chokes Up Discussing Emotional Trip to Spain wit…

Celebrity Guests Send Farewell Messages After 17 Seasons of the …
Waited ‘til the last minute to get your Halloween costume act together (for yourself or your kids)? You’re in luck, because we’ve got 3 adorable ideas for every age from master crafter and self-proclaimed “Duct Tape Queen,” Richela Fabian Morgan, author of the DIY duct tape book series. All you need is some duct tape, cardboard and a few basic pieces from your closet. Watch the video above and see full instructions plus step-by-step pictures below for cute, last-minute costumes that cost almost nothing.
Baby: Zebra

Rachael Ray Show
Materials: black duct tape, white knit hat, white sweater or hoodie, 5 small binder clips, 1" safety pin
Tools: scissors, craft knife, ruler, cutting mat
Mane and Head
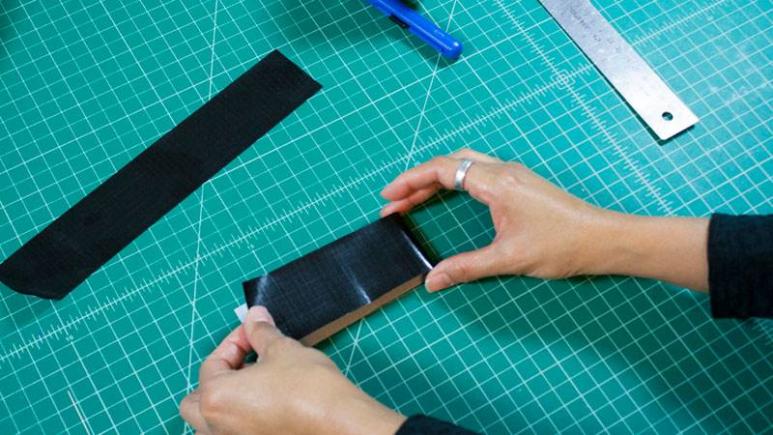
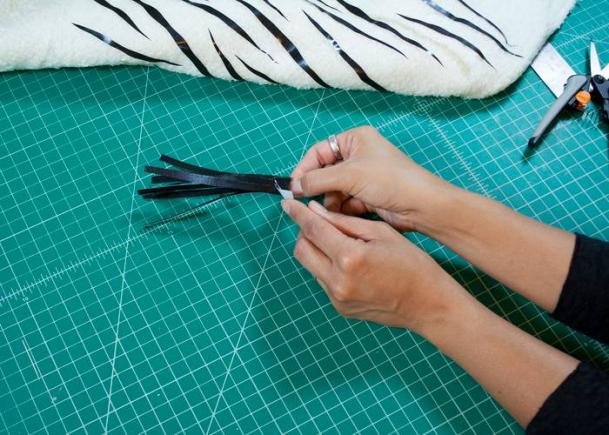
1. Cut a 10" strip of black duct tape and fold it in half crosswise, sticky sides facing each other. You should now have a 5" double-sided strip. Repeat five more times until you have 6 double sided strips. Cut slits into each strip lengthwise, creating long fringes.
Rachael Ray Show

Rachael Ray Show
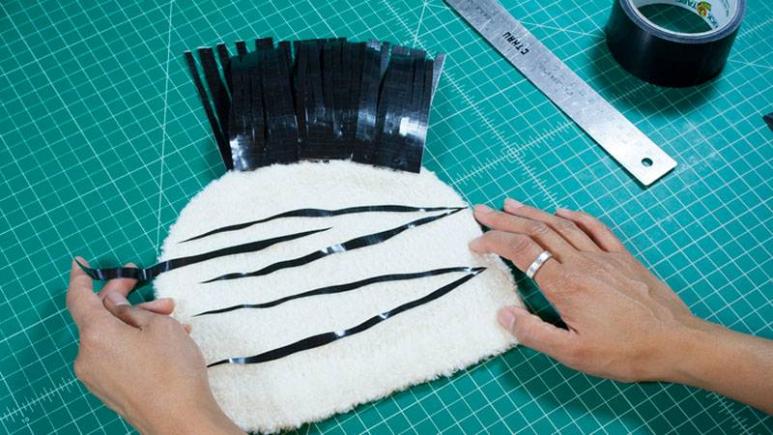
2. Place small rolled up pieces of duct tape (any color) to the binder clips, sticky sides facing out, then attach the fringed strips to the clips. Press down on the rolled up pieces of tape to secure the strips. This is the zebra mane.

Rachael Ray Show

Rachael Ray Show
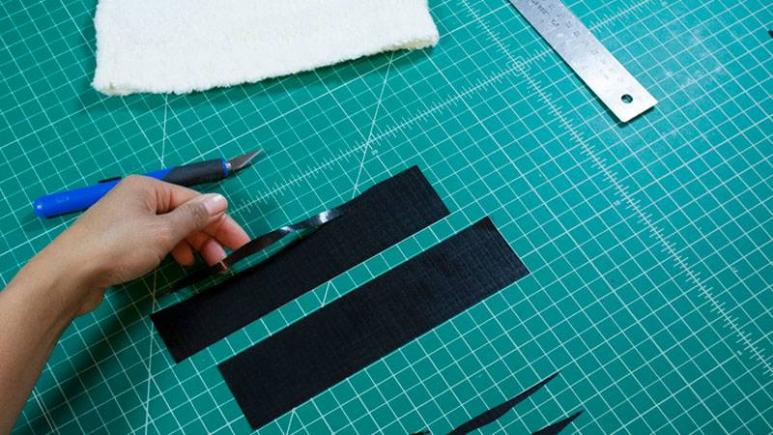
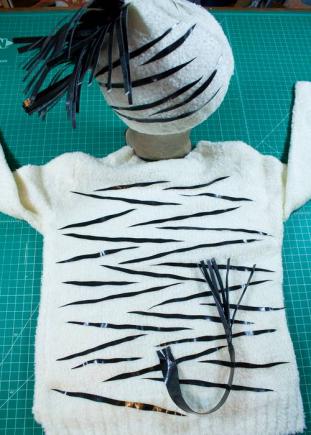
3. Place several 8" strips of black duct tape on your cutting mat. Using your craft knife, cut out long, curvy strips that are approximately no wider than 1/2" and taper at each end. Place them on the hat, staggering them in a zebra pattern. (For inspiration, do a Google search for "simple zebra patterns.")
Rachael Ray Show
Rachael Ray Show
Body
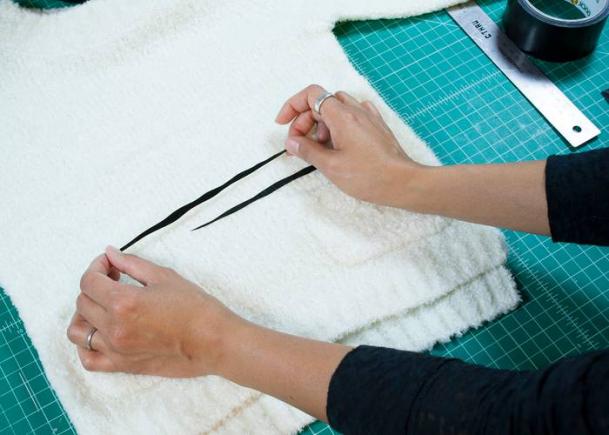
4. Place several 8" strips of black duct tape on your cutting mat. Using your craft knife, cut out long, curvy strips that are approximately no wider than 1/2" and taper at each end. Place them on the sweater, staggering them in a zebra pattern.
Rachael Ray Show
5. Cut a 10" strip of black duct tape and fold it in half cross-wise, sticky sides facing each other. You should now have a 5" double-sided strip. Cut slits into the strip lengthwise, creating long fringes. Roll the strip around at the uncut base, and hold it in place by wrapping a piece of black duct tape around it. This is the bottom of the tail.
Rachael Ray Show
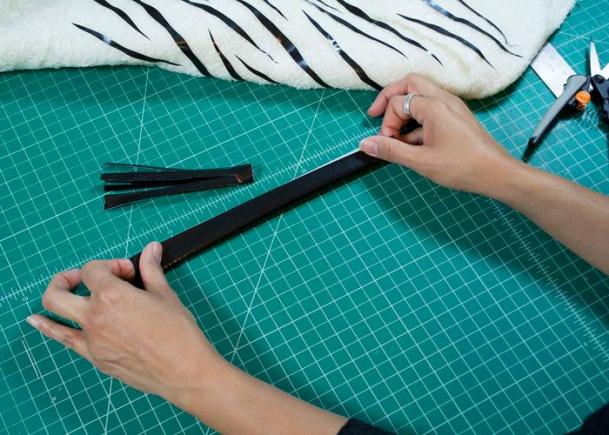
6. Cut a 10" strip of black duct tape and fold it in half lengthwise, sticky sides facing each other. You should now have a 10" double-sided strip that is approximately 1" wide. This is the main part of the tail. Attach the bottom of the tail to one end with a small piece of black duct tape. Secure the top of the tail to the backside of the sweater with a 1" safety pin.
Rachael Ray Show
Rachael Ray Show
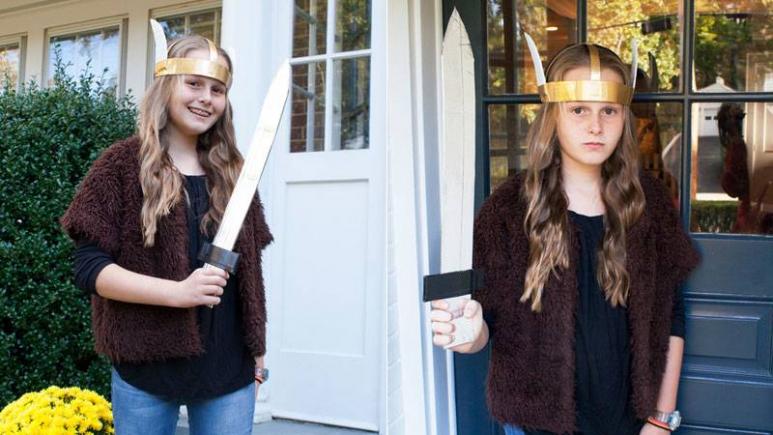
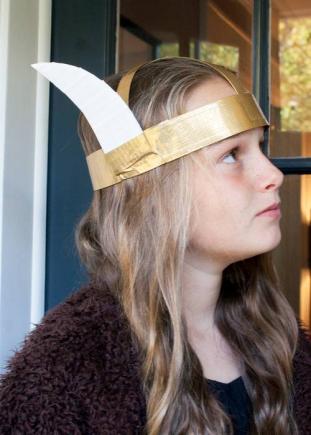
Elementary Age: Viking
Rachael Ray Show
Materials: gold, silver, black, and white duct tape, cardboard
Tools: tape measure, scissors, craft knife, ruler, cutting mat
Viking Hat
1. Cut a 24" strip of gold duct tape. Place on your worktable with the sticky side facing up. Fold over the top and bottom long edges approximately 1/4" each. Cut another 24" strip of gold duct tape and trim the width down to 1 1/4". Place on top of the first strip, sticky sides facing each other. This is the brim of the hat.
2. Place the brim around your child's head measure the circumference. Trim down the brim so that it fits snug but not tight. Attach the ends together from the inside with a piece of gold duct tape, creating a circle.

Rachael Ray Show
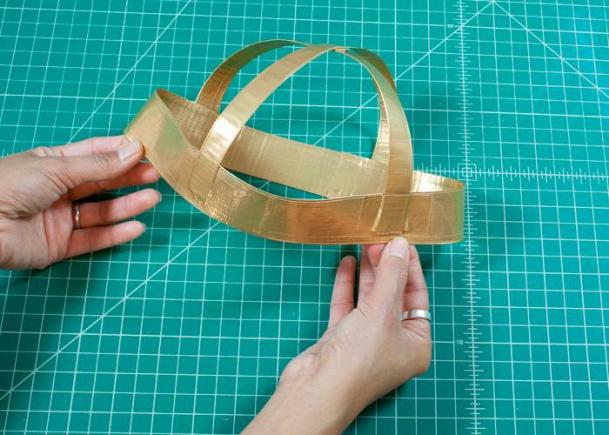
3. Take 2 strips of gold duct tape that each measure 12". Fold each strip in thirds lengthwise. Place them on your worktable in an X formation. Connect the strips in the middle with a small piece of tape.

Rachael Ray Show
4. Place the X on top of your child's head and attach the ends of the strips to the brim with pieces of gold duct tape. This is the shell of the hat. Remove the hat and turn it inside out. The attached strip ends should now be on the inside of the brim.
Rachael Ray Show
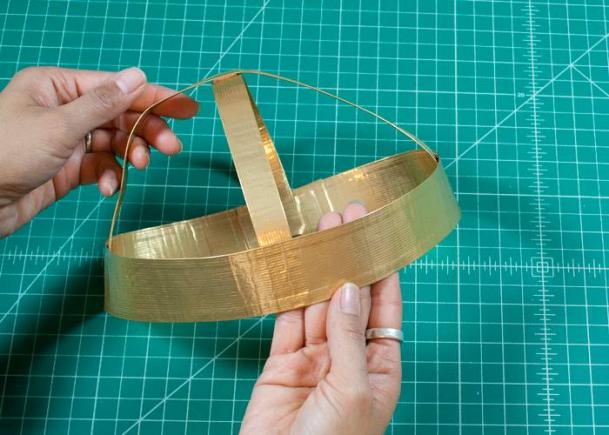
Rachael Ray Show
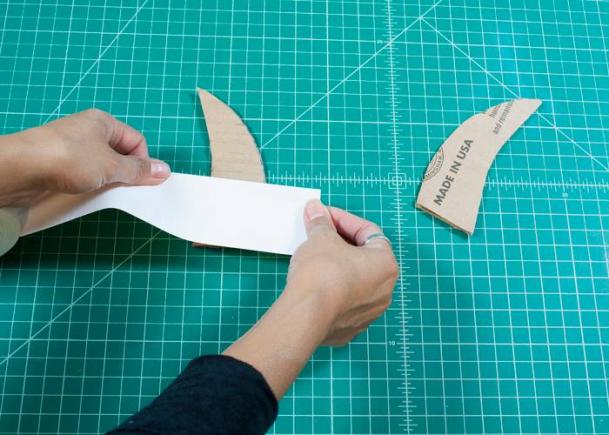
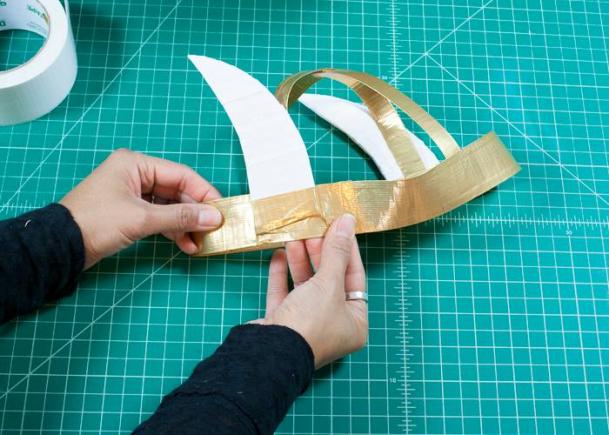
5. Cut 2 horn shapes from the corrugated cardboard. Cover them with white duct tape. Attach them to the sides of the hat with gold duct tape.
Rachael Ray Show
Rachael Ray Show
Rachael Ray Show
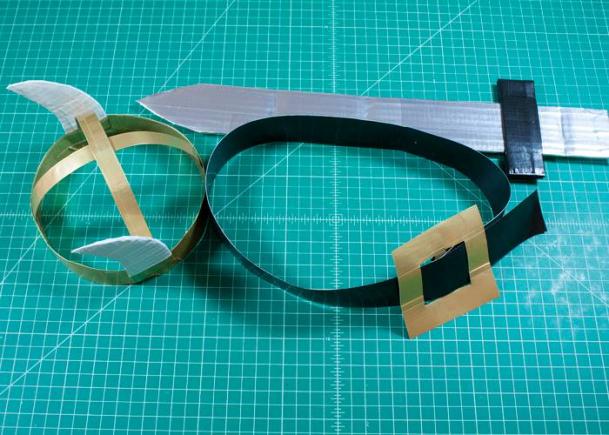
Sword
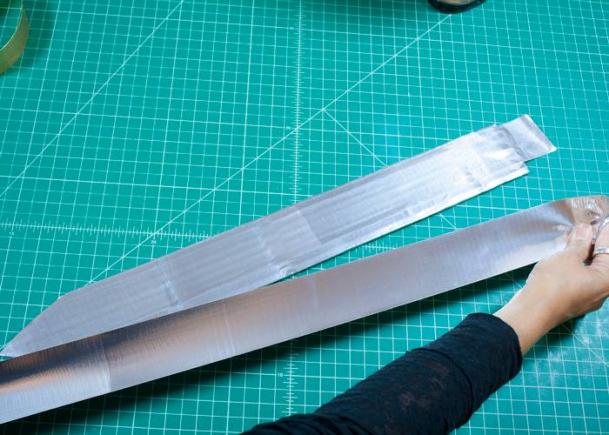
6. Cut the corrugated cardboard into a tall, rounded triangle that measures 20" long and 2 1/2" wide at the base. Cover it with silver duct tape. This is the blade of the sword.
Rachael Ray Show
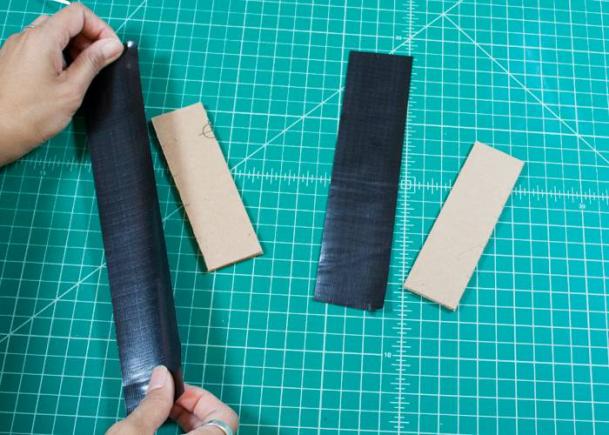
7. Cut two pieces of corrugated cardboard that each measure 5" long x 1 1/2" wide. Cover each with black duct tape. These are the tops of the sword handle.
Rachael Ray Show
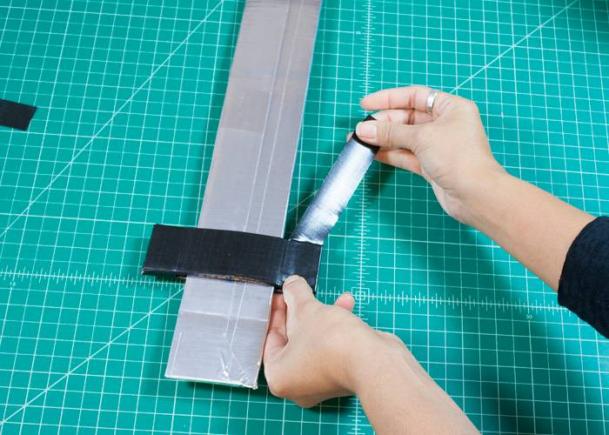
8. Place one top underneath the blade crosswise, approximately 3" from the edge of one end. Place the other top on top of the blade cross-wise, right above the first top. Wrap a strip of black duct tape around each pair of top ends to connect them. Then wrap the bottom of the blade below the tops with black duct tape.
Rachael Ray Show
Belt
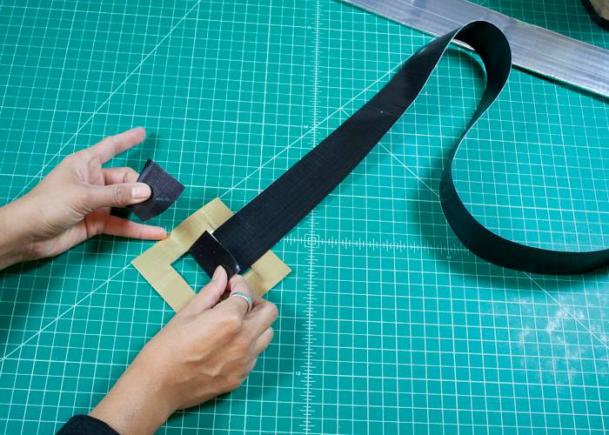
9. Cut a 14" strip of white duct tape and fold it in half cross-wise, sticky sides facing each other. You should now have a 7" double-sided strip. Repeat step 3 more times until you have 4 double-sided strips. Using 2" pieces of black duct tape, connect the strips at the ends to create a single double-sided strip that measures 28". This is the belt. (If this is not long enough, make one more 7" double-sided strip and add it on.)
10. To make the buckle of the belt, make a double-sided gold duct tape fabric that measures 4" square. (For help with this step, watch this YouTube video) Cut two inner rectangles that each measure 2" high x 1/2" wide. Loop one end of the belt through and secure it to the middle of the buckle with a piece of black duct tape. Place the belt around your child's waist and then loop the other ends of the belt through the buckle.
Rachael Ray Show
Rachael Ray Show
Teen/Adult: Lady Bug
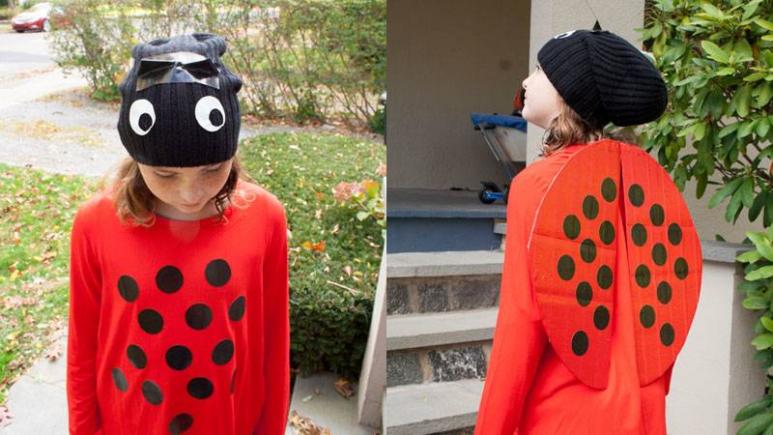
Rachael Ray Show
Materials: black, white, and red duct tape, red sweatshirt or long sleeve shirt, black knit hat, 24-gauge wire, cardboard
Tools: pencil, pen, parchment paper, scissors
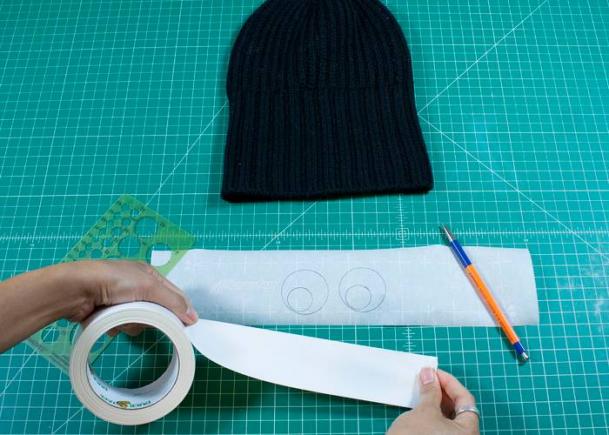
Hat
1. Add eyes to the hat. On the parchment paper trace a1 7/8" diameter circle twice. Then trace a 3/4" diameter circle inside each bigger circle. Cover tracing with white duct tape. Flip the parchment paper over and you should be able to still see you tracing. Cut out the two circles. Remove the parchment paper from the back of the circles and place them on the hat.
Rachael Ray Show
2. Make the antennae. Cut a 8" strip of black duct tape and fold it in half cross-wise, sticky sides facing each other. You should now have a 4 " double-sided strip. Trace a 1" circle twice onto the strip using pen. Cut out the circles. Cut a 20" piece of wire. Attach a circle to each end of the wire with a piece of black duct tape.
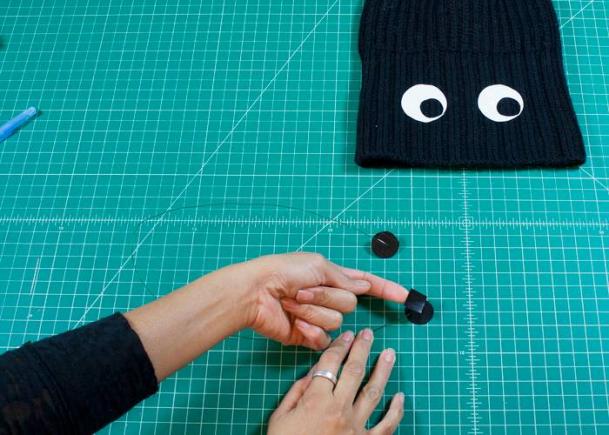
Rachael Ray Show
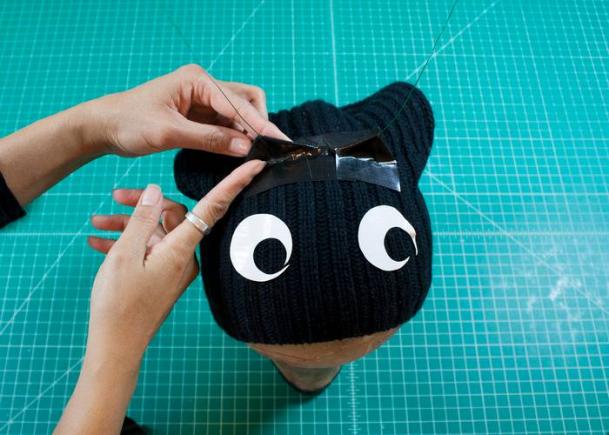
3. Place the hat on your head. Be sure the eyes are on the front of the hat. Take the antennae and position it on top of the hat so the ends are on each side of your head. Attach the antennae to the hat with small pieces of black duct tape.
Rachael Ray Show
Shirt
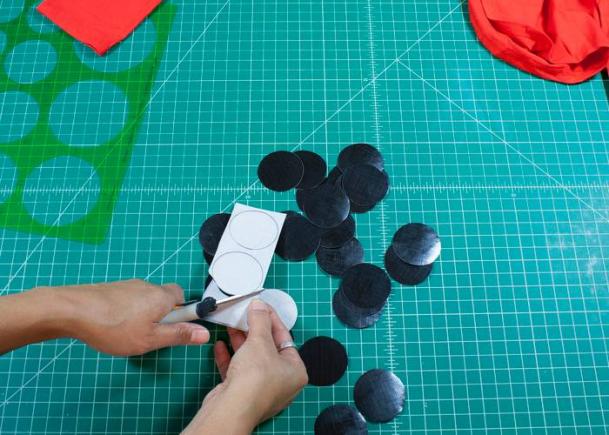
4. Place several strips of black duct tape across a sheet of parchment paper measuring 15" x 10". Flip parchment paper over. Using the circles template, trace as many 1 7/8" diameter circles as possible. Be sure to stay within the edges of the tape strips. Cut out the circles. Remove the parchment paper from the back of half of the circles and place them on the red shirt. Save the other half of the black circles for the wings.
Rachael Ray Show

Rachael Ray Show
Wings
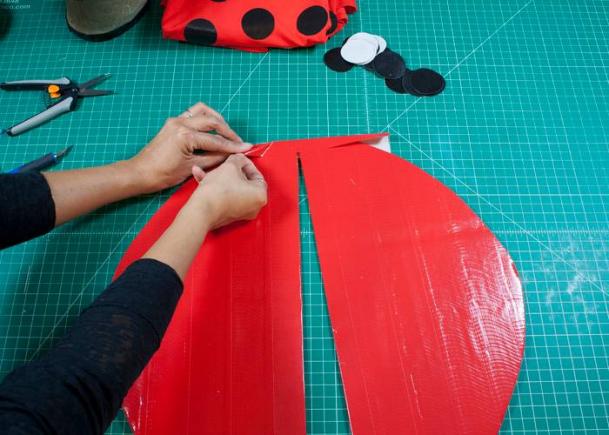
5. Cut two half moon shapes out of the corrugated board that have a base of 18". Cover the front of each half moon with red duct tape. Connect them with a piece of red duct tape at the top inside corners.
Rachael Ray Show
6. Remove the parchment paper from the remaining black circles and place it on one side of each of the half moons. These are the wings.
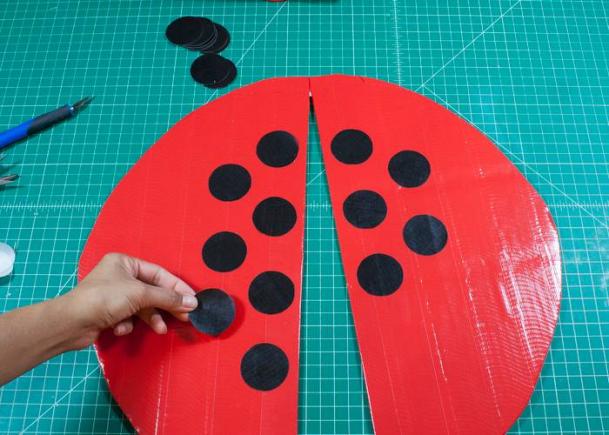
Rachael Ray Show
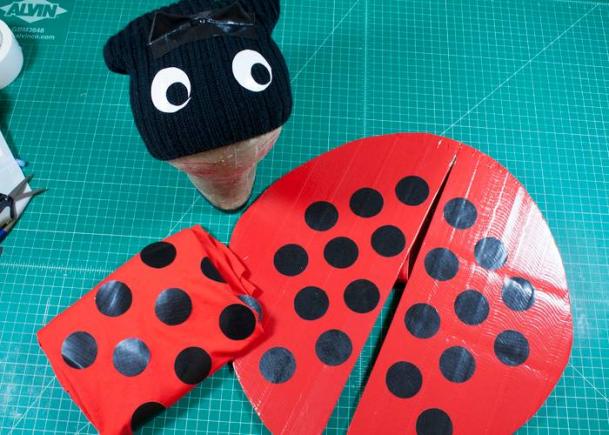
7. Cut a 14" strip of red duct tape and fold it in half cross-wise, sticky sides facing each other. You should now have a 7" double-sided strip. Repeat step twice so you have 3 double-sided strips. Using 2" pieces of black duct tape, connect the strips at the ends to create a single double-sided strip that measures 21". This is the arm loop. (If this is not long enough, make one more 7" double-sided strip and add it on.) Repeat step for the second arm loop.
8. Flip the wings over. Attach an arm loop to each wing with red duct tape.
Rachael Ray Show
Get excited for Rachael's Big Top Halloween Circus Extravaganza on Monday, October 31, 2016 with Rach and John's highly anticipated costume reveal, Bob Harper's post-candy-binge prescription and a snack-o-lantern cheese fondue! Find out when the show is on in your area here.
MORE:
Rachael Ray’s Amazing Halloween Costumes Through the Years
13 Adorably Spooky Halloween Treats to Make and Eat with Your Kids
Sneak Peek of Our Halloween Circus Extravaganza + Thanksgiving Countdown