


How to Turn Your Linoleum Floor Into a Masterpiece

Q&A with Organizational Pro Peter Walsh + Dermatologist Shares A…

Actor Hank Azaria + Freezer Meals + Artichokes 2 Ways with Rach

See Inside Barbara Corcoran's Stunning NY Apartment + It's Steak…

How to Make Chicken and Lobster Piccata | Richard Blais

Donnie Wahlberg Spills Details About NKOTB's First Ever Conventi…

Donnie Wahlberg + Jenny McCarthy Say Rach Is Such a "Joy" + Look…

The Best Moments From 17 Seasons of the Show Will Make You Laugh…

How to Make Crabby Carbonara | Rachael Ray
Rach Chats "Firsts" In Flashback From Our First Episode Ever In …

How to Make Apple-Cider Braised Pork Chop Sandwiches with Onion …

Rach's Chef Pals Say Goodbye to Show in Surprise Video Message

How to Make Sesame Cookies | Buddy Valastro

How to Make Tortilla with Potatoes, Piquillo Peppers and Mancheg…

How to Make Shrimp Burgers | Jacques Pepin

How to Make Spanakopipasta | Rachael Ray

Andrew McCarthy Chokes Up Discussing Emotional Trip to Spain wit…

Celebrity Guests Send Farewell Messages After 17 Seasons of the …

Celebrity Guests Send Farewell Messages After 17 Seasons of the …

Andrew McCarthy Teases Upcoming "Brat Pack" Reunion Special

Michelle Obama Toasts Rach's 17 Years on the Air With a Heartfel…
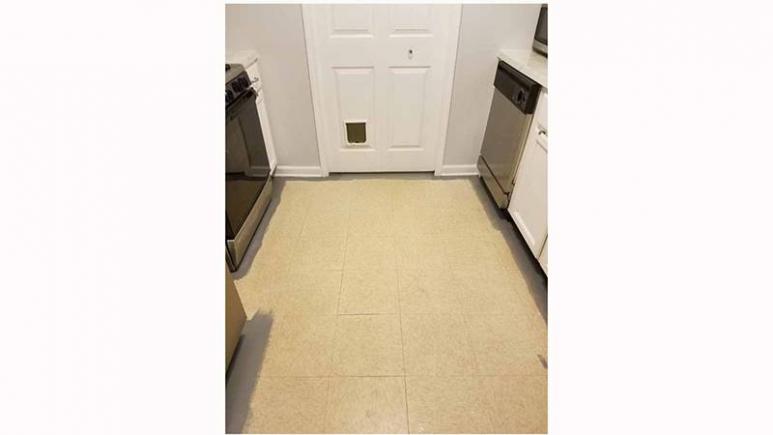
Do you have an outdated linoleum floor that drives you NUTS?
You're not alone!
Roxanne, mom of two and DIY expert behind the blog The Honeycomb Home, is a pro at projects that give a luxurious look on a budget -- and no linoleum is safe from her! When her niece wanted to get rid of her ugly yellow linoleum floors, Roxanne jumped right in.
RELATED: How to DIY a Seashell Chandelier
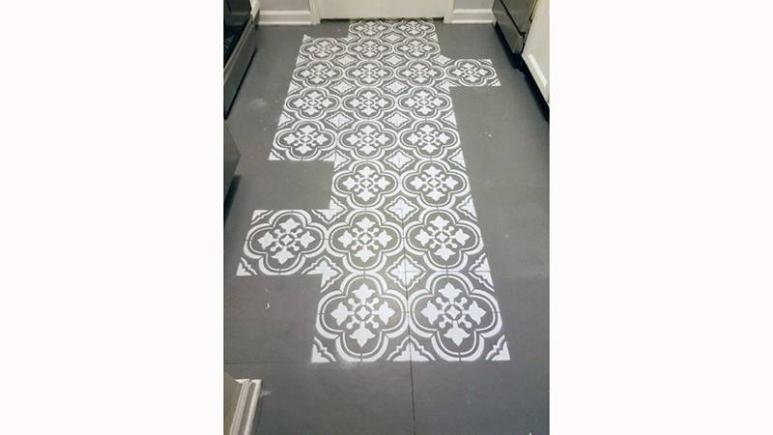
With just a stencil and gray and white spray paint, a dated floor was instantly transformed into a unique “tiled” masterpiece, reminiscent of pricey European tile.
Itching to do this in your home?
Luckily, Roxanne shared her step-by-step how-to with us!
HERE'S WHAT YOU'LL NEED:
Paint Sprayer
Floor Stencil
Painter’s Tape
White Paint – (plain white eggshell enamel paint)
Slate Gray Porch & Patio Paint
Rust-Oleum Polyurethane Floor Sealer
Extension Paint Roller
And here’s exactly how she did it:
1. Paint the perimeter of the room with porch paint.
Rachael Ray Show
2. Using an extension paint roller, paint the rest of the floor.
Let the paint dry for a day or two before beginning to stencil.
(In hindsight -- though she was hoping to avoid this step by using porch paint -- Roxanne suggests using a sealer when she was done painting, since the porch paint ended up being less durable than expected.)
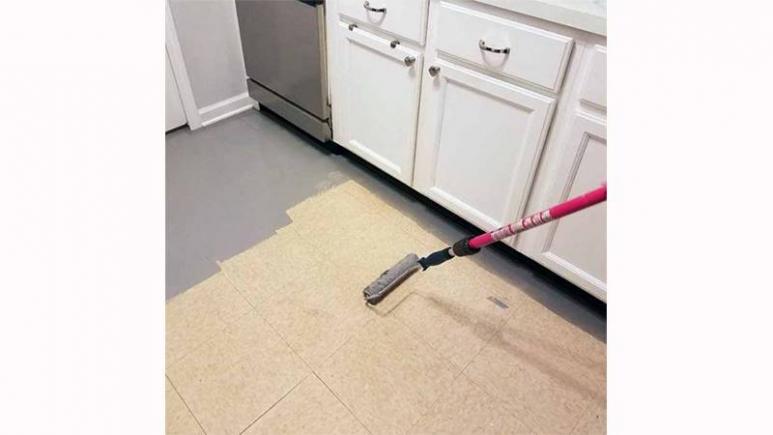
Rachael Ray Show
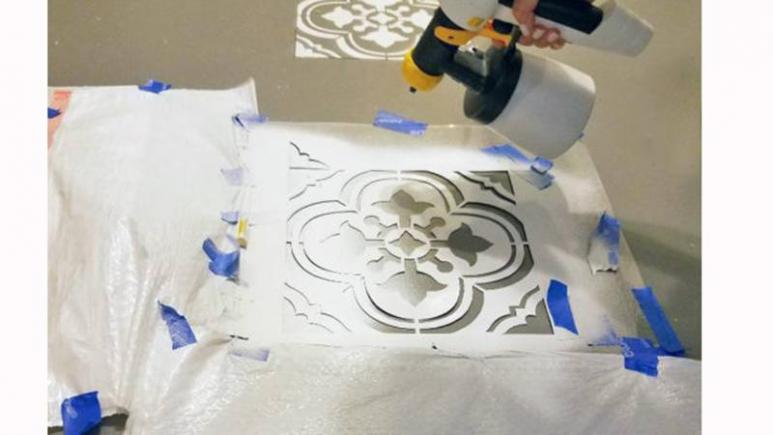
3. Using a paint sprayer and stencils, start stenciling!
(Roxanne practiced on a piece of cardboard first!)

Rachael Ray Show
If you have an overspray problem like Roxanne did, place a barrier on the slimmer sides of the stencil. (Though she initially only had garbage bags on hand, she prefers cardboard as a barrier.)
Rachael Ray Show
Roxanne suggests saving the end and corner tiles for last, since you’ll have to bend your stencils to get those sections to look good.
Rachael Ray Show
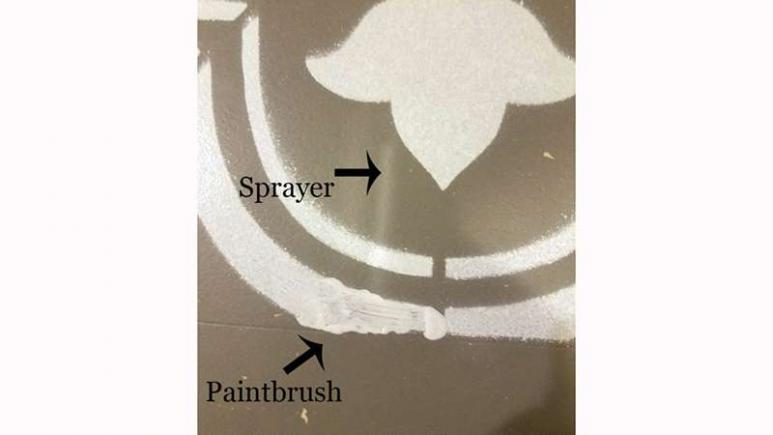
In terms of precision, look what a difference the paint sprayer made!
Rachael Ray Show
4. After the paint dries, apply the floor sealer -- and don’t walk on the floor for about 24 hours after!
Read more about this project on The Honeycomb Home here, and get lots more DIY ideas like how to make a pegboard spice rack!